Monday, April 23, 2012

Buffaloaf

Serves 4*

Okay, I'm not one to toot my own horn, BUT this has to be one of the best things I've ever eaten, let alone come up with.  The photo does it no justice.  If you've ever eaten bison/buffalo meat, you will appreciate this recipe by just reading the ingredients... if you haven't tried bison/buffalo meat yet, you are in for a treat.  Bison is so much leaner than beef, AND tastes even yummier in my opinion.  According to an article on Livestrong.com, "a 3 oz. serving of beef sirloin contains 12 grams of fat, while 3 oz. of bison sirloin contains just 5 grams. Beef sirloin is also higher in saturated fat, with 5 grams, compared to 2 grams of saturated fat in bison sirloin."  Pretty impressive, huh?  Ground bison can be found at your local Whole Foods Market (or other high end grocery), and even some basic grocery stores - just ask your butcher!  I made Garlicky Spaghetti Squash on the side, and it was a perfect meal.  I hope you enjoy this as much as I did!!

*Just a tip: you will probably want to double this so that you have left-overs!


Ingredients:
  • 1.5 lbs. ground buffalo (bison)
  • 15 oz. of Rao's Marinara Sauce (or your favorite marinara/spaghetti sauce)
  • 2 eggs
  • 1 cup whole wheat Panko crumbs
  • 1/4 cup sweet onion, chopped
  • 2 tbsp. fresh basil, chopped
  • 1 can of chipotle peppers in adobo sauce - use 1 pepper, deseed and finely chop - about 1 tbsp.
  • 8 oz. fresh mozzarella cheese (Buffalo mozzarella if you feel like spending the $!), cut into 1/4 inch slices
  • 1 tsp. Kosher salt
  • 1/4 tsp. freshly cracked black pepper
  • 2 tbsp. grated parmesan cheese, for topping
Directions:

Preheat oven to 350.  In a large bowl, combine the buffalo meat, half of the marinara sauce, eggs, Panko crumbs, chipotle pepper, onion, basil, salt, and black pepper.  Mix well.  Divide the mixture into thirds.  Spread 1/3 in the bottom of an ungreased 9x5" loaf pan.  Place half of the mozzarella slices on top.  Repeat layers, and end with the meat.  Bake for 30 minutes.  Spread the rest of the sauce on the buffaloaf. Bake for an additional 20 minutes.  Remove from oven, and add parmesan to top.  Bake for 5 minutes more.  Let sit for 5 minutes before serving.  Enjoy!!

Friday, April 20, 2012

Chipotle Goat Cheese "Caprese-style" Salad

Serves 4

The other night, I had some leftover goat cheese and a can of chipotle peppers in adobo sauce from another couple of recipes I will post soon.  I decided to make my own little version of a Caprese salad!  This is such a quick and easy recipe - perfect for a night when you don't have a lot of time to cook, or when you need to take an app to a party, but need more time to get primped and pretty! ;) 


Ingredients:
  • 4-5 medium GOOD, ripe tomatoes, cut into 1/2-3/4" slices
  • About 2.5 oz. goat cheese, softened
  • Can of chipotle peppers in adobo sauce - use 1 chipotle pepper, deseeded and finely chopped (about 1 tbsp.)
  • A few onions from can of chipotle peppers in adobo sauce, finely chopped (optional)
  • Freshly ground black pepper
  • Fresh dill and sea salt for finishing
Directions:

In a small bowl, mix together goat cheese, chipotle pepper, onions, and black pepper (to taste).  Arrange tomatoes on a pretty serving plate.  Scoop a dollop of the chipotle goat cheese mixture onto the middle of each tomato.  Top with sprigs of fresh dill, and sprinkle with desired amount of sea salt. Yum! :)

Monday, April 9, 2012

Bacon Egg and Cheese Tart

Serves 4

While I was in the check-out aisle at the grocery store the other day, I glanced over to see an amazing looking breakfast creation on the cover of the Food Network Magazine. I picked up the magazine to glance at the recipe, and decided to go ahead and buy it because every page I turned to had something delicious on it. I decided this breakfast tart would be the perfect dish to make for my family on Easter morning - which it was! Unfortunately I bought the magazine a little too late, because there was a contest to think up a clever name for the tart, but the contest had expired. I'll update the name when they pick a winner! For the record, I would've called it "Breakfast in a Basket."


Ingredients:
  • All-purpose flour, for dusting
  • 1 sheet frozen puff pastry (half of a 17-to-18-ounce package), thawed
  • 2 strips bacon (I use 4 strips)
  • 1 1/2 cups shredded havarti cheese (or more!)
  • 3 tablespoons shredded parmesan cheese
  • 4 large eggs
  • Kosher salt and freshly ground pepper
  • Chopped fresh chives, for topping
Directions:

1. Preheat the oven to 425º F. Line 2 baking sheets with parchment paper. On a lightly floured surface, roll out the puff pastry into a 12-inch square, then cut into 4 equal squares. Slightly fold and pinch the edges of each square to form 4 round tart shells. Transfer to the prepared baking sheets and prick all over with a fork. Bake until golden, 8 to 10 minutes.

2. Meanwhile, cook the bacon in a medium skillet over medium heat, turning, until crisp, 8 to 10 minutes. Transfer to paper towels to drain, then crumble.

3. Let the tart shells cool slightly on the baking sheets. If the centers are very puffy, prick with a fork to deflate. Sprinkle evenly with the havarti and parmesan. Make a shallow well in the cheese in the center of each tart and crack an egg into each; season with salt and pepper. Top with the bacon, then return to the oven and bake until the egg whites are set, 10 to 15 minutes. Top with chives.

*I served the tarts with fresh fruit and sparkling rosé champagne (mimosas would be great, too).


Friday, April 6, 2012

Oven-Fried Chicken

Serves 4

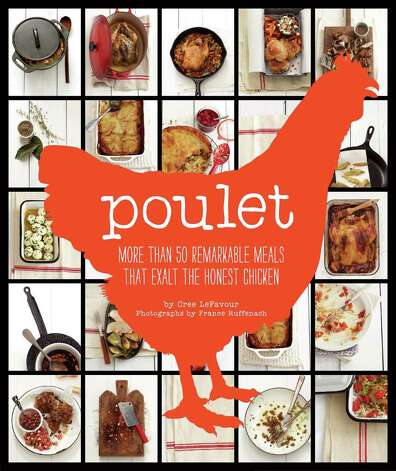
Something about Anthropologie makes me the happiest girl on Earth when I'm walking around the store - especially when the clearance section has something I can't live without.  That's just what happened recently when I came across the cookbook, "Poulet - More Than 50 Remarkable Meals That Exalt The Honest Chicken," by Cree LeFavour, sitting alone on the clearance bookshelf.  I opened the book, and after reading only a few pages, I knew I was going to absolutely love cooking from this book.  Not only does Poulet have amazing recipes, but it also has wonderful advice that I've taken and run with in my own recipes.

This is one of my favorites so far... It's super crispy oven-fried chicken.  While it's so much healthier than deep-fried chicken, it's flavor and texture trumps any fried chicken I've had - partly because you don't have guilt from all of the oil you're wiping off of your face at the end of the meal!  The photo above shows the chicken breasts I made (the original recipe calls for thighs).  I've made both the thighs and breasts with this recipe, and although I love dark meat, I really liked how much crispier the breasts were since they have to be in the oven for a longer period of time.  I hope you enjoy this recipe as much as I do!  I'm sure that I will be posting another recipe from this cookbook in the near future! :)

Poulet Cookbook

Ingredients:
  • 1/4 cup milk
  • 1/4 cup olive oil
  • Juice of 2 lemons
  • 1 tsp. Kosher salt, plus 1 tbsp.
  • 8-10 bone-in, skin-on chicken thighs (or 4 bone-in, skin-on chicken breasts)
  • 1 cup all-purpose flour
  • 1/2 tsp. cayenne pepper
  • Black pepper
  • Flaky salt for finishing
  • 1/4 cup coursely chopped fresh chives or parsley

Directions:

In a large bowl, stir together the milk, olive oil, lemon juice and the 1 tsp. Kosher salt.  Add the chicken to the bowl and turn to coat on both sides.  Marinate at room temperature for at least 30 minutes and up to 1 hour, or cover and refrigerate up to 24 hours. If refrigerating, return the chicken to room temperature for 30 minutes or so to take the chill off before cooking.

Preheat the oven to 400° F.

Stir together the flour, 1 tbsp. Kosher salt, and cayenne in another large bowl.  Season with the black pepper.  Lift the chicken pieces from the marinade and dredge in the seasoned flour to coat on both sides.  Give each piece a little shake to remove any excess flour.  Lay the pieces on a parchment paper-lined or lightly greased baking sheet, skin-side up.

Bake the chicken for 30-40 minutes, turning after 15 minutes, or until the crust is a deep, golden brown.  Either insert an instant-read thermometer into the thickest part of a thigh or cut into a thigh with a paring knife.  The thermometer should register 175° F.  If using a knife, look for clear, not red or pink, juices running from the spot where you pierced the meat and opaque, barely pink flesh at the bone.  If the chicken isn't done, bake for 5 to 10 minutes longer and check it again.

When the chicken is done, remove it from the oven, sprinkle with a little flaky salt, and let rest for 5 minutes.  Arrange on a platter or divide among individual plates.  Scatter the chives or parsley on top and serve.

Wednesday, April 4, 2012

Oyakodon (Japanese Comfort Food)

Serves 4 
(I double this recipe taken from AllRecipes.com)

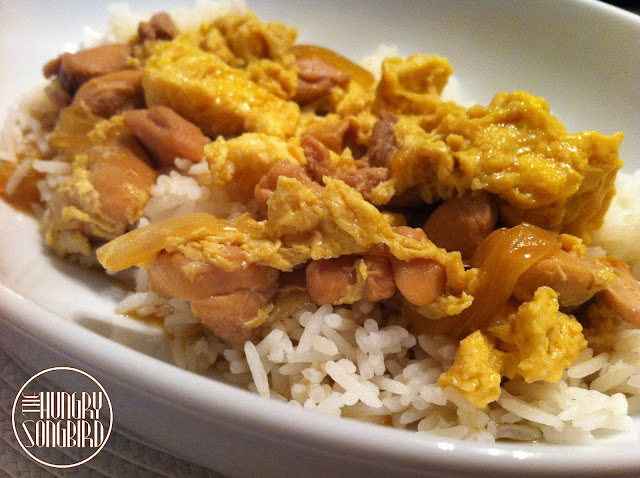
Oyakodon is a traditional Japanese rice bowl topped with simmered chicken, onions, and egg.  This is one of my father's all-time favorite meals, so I try to make it for him frequently. He describes it as, "Japan's version of meat and potatoes - it's a country-style dish."  This recipe is so delicious, and deceivingly easy to make!

Regarding the rice... My very good Thai friend, Lek, gave me some advice that I'll never forget. She told me that washing Jasmine rice (as you do with other types of rice) will diminish the amazing flavor of the rice, so cook with it unwashed! When cooking your rice in a rice cooker, the instructions will typically say to use a 1:1 water to rice ratio. This is true with washed rice because water will still be present... When cooking your Jasmine rice, add about 1/8 - 1/4 cup of water extra per cup to make up for the water not used. :)


Ingredients:
  • 2 cups uncooked, unwashed Jasmine rice (cook as directed on the package, or follow the rice cooker instructions above)
  • 4 skinless, boneless chicken thighs, cut into small pieces
  • 1 onion, cut in half and sliced
  • 2 cups dashi stock, made with dashi powder OR chicken stock (if you can't find dashi)
  • 1/4 cup soy sauce
  • 3 tablespoons mirin (Japanese rice wine)
  • 3 tablespoons brown sugar
  • 4 eggs
Preparation:

Prepare your Jasmine rice.

Place the chicken in a nonstick skillet with a lid, and cook and stir over medium heat until the chicken is no longer pink inside and beginning to brown, about 5 minutes. Stir in the onion, and cook and stir until the onion is soft, about 5 more minutes. Pour in the stock, and whisk in soy sauce, mirin, and brown sugar, stirring to dissolve the sugar. Bring the mixture to a boil, and let simmer until slightly reduced, about 10 minutes.

Whisk the eggs in a bowl until well-beaten, and pour over the chicken and stock. Cover the skillet, reduce heat, and allow to steam for about 5 minutes, until the egg is cooked. Remove from heat.
To serve, place 1 cup of cooked rice per bowl into 4 deep soup bowls, top each bowl with 1/4 of the chicken and egg mixture, and spoon about 1/2 cup of soup into each bowl.

You will probably be sorry that you didn't double this if you're cooking for more than 2 people, so keep this in mind! ;) Enjoy!